Are you hunting high and low for how to create amazon affiliate niche site from scratch?
Or Are you in a witch hunt for the best niche for amazon affiliate marketing 2024?
Or how to do niche research for amazon affiliate blog that can enable you to make at least $1000+ a month within a year?
If any one of the questions is stumbling in your head then you are in the right place. Here you will learn how to do niche research for affiliate marketing and how to create amazon affiliate niche sites from scratch.
What is an Amazon Affiliate Niche Site?
Unlike the investing blog that focuses on investing basics or personal finance blogs that offer detailed insights about how to pay off the debt, or how to prepare an effective financial plan to stop living paycheck to paycheck, amazon niche sites offer detailed blog posts of specific products or categories.
Simply put, a niche site focuses on a specific category, be it Cameras, Headphones, Laptops, or Pets. And it offers detailed blog posts around that niche. For example, the Audio niche site delivers detailed blog posts on Headphones, Earphones, On & Over-ear headphones, Wireless headphones, Noise-cancelling headphones, Bluetooth speakers, Multimedia speakers, and Home theater systems, etc.
For example, Blogging Outlook is NOT an Amazon affiliate niche site, since we don’t make a penny from Amazon Associates. On the other hand, Review Pursuit is an Amazon niche site. Amazon Associates is the sole income source of Review Pursuit. Here is the screenshot of the Amazon affiliate income of Review Pursuit.
If you have upside-down knowledge and expertise in any subject, then the chances are higher that you can start a niche blog from scratch within a week. Don’t create a blog that covers all the categories namely Electronics, Pets, Home, and Kitchen. It requires a lot more time and effort to get succeed as compared to a niche site that covers a single category.
In fact, you can start an Amazon niche blog right now when you know how to start a blog, how to optimize a blog post for a specific keyword, and how to attract search engine traffic.
Now, it’s your turn to build a niche site that focuses on a particular category that has a decent affiliate commission.
How does the Amazon Affiliate Program work?
Amazon Associates pays a webmaster a percentage of the purchased products when a customer visits Amazon by clicking on the product link that is embedded in the blog over the next 24 hours.
What commission you will get depends on what category’s product the consumer purchases.
Suppose your blog attracts 5000+ visitors a month. Among them, 100 visitors a month purchase the products via your affiliate links. It means the conversion rate is 2%. When you promote high-ticket products then you can easily make $1000+ a month. For example, let’s assume you are promoting Luxury Beauty products that offers a 10% affiliate commission and the price of the product is $100. Now, if 100 consumers buy from your affiliate links then you will make $1000 a month by promoting luxury beauty products.
Why should I start an Amazon Affiliate Niche Blog?
Whatever your target niche is, Amazon doesn’t disappoint you. You will find relevant products that you can promote in your amazon affiliate blog. Just write a detailed blog post of 4000+ words and leverage link building strategies to attract search engine traffic. When your blog gets search engine traffic then you will find that you have successfully created an amazon affiliate site that makes money even when you fall asleep.
You will find various affiliate programs in the ‘Pet’ niche that offer as high as 30% affiliate commission. The affiliate commission of Amazon Affiliate is pathetically low and hovers between 10% and 1% across various niches. Affiliate products attract a different affiliate commission on different categories. For example, when you promote Luxury beauty products, and Amazon Coins you will make a higher affiliate commission. The commission rate is 10% when compared to Grocery items that attract a 1% affiliate commission.
Simply put, if you target the category that attracts a 10% affiliate commission i.e. Luxury beauty products or Amazon coins, the chances are higher that you can surpass the threshold limit of $1000 a month. But if you promote Grocery items and Health & Personal care products then you will not probably make even $10 a day, because the affiliate commission is pathetically low i.e. 1%.
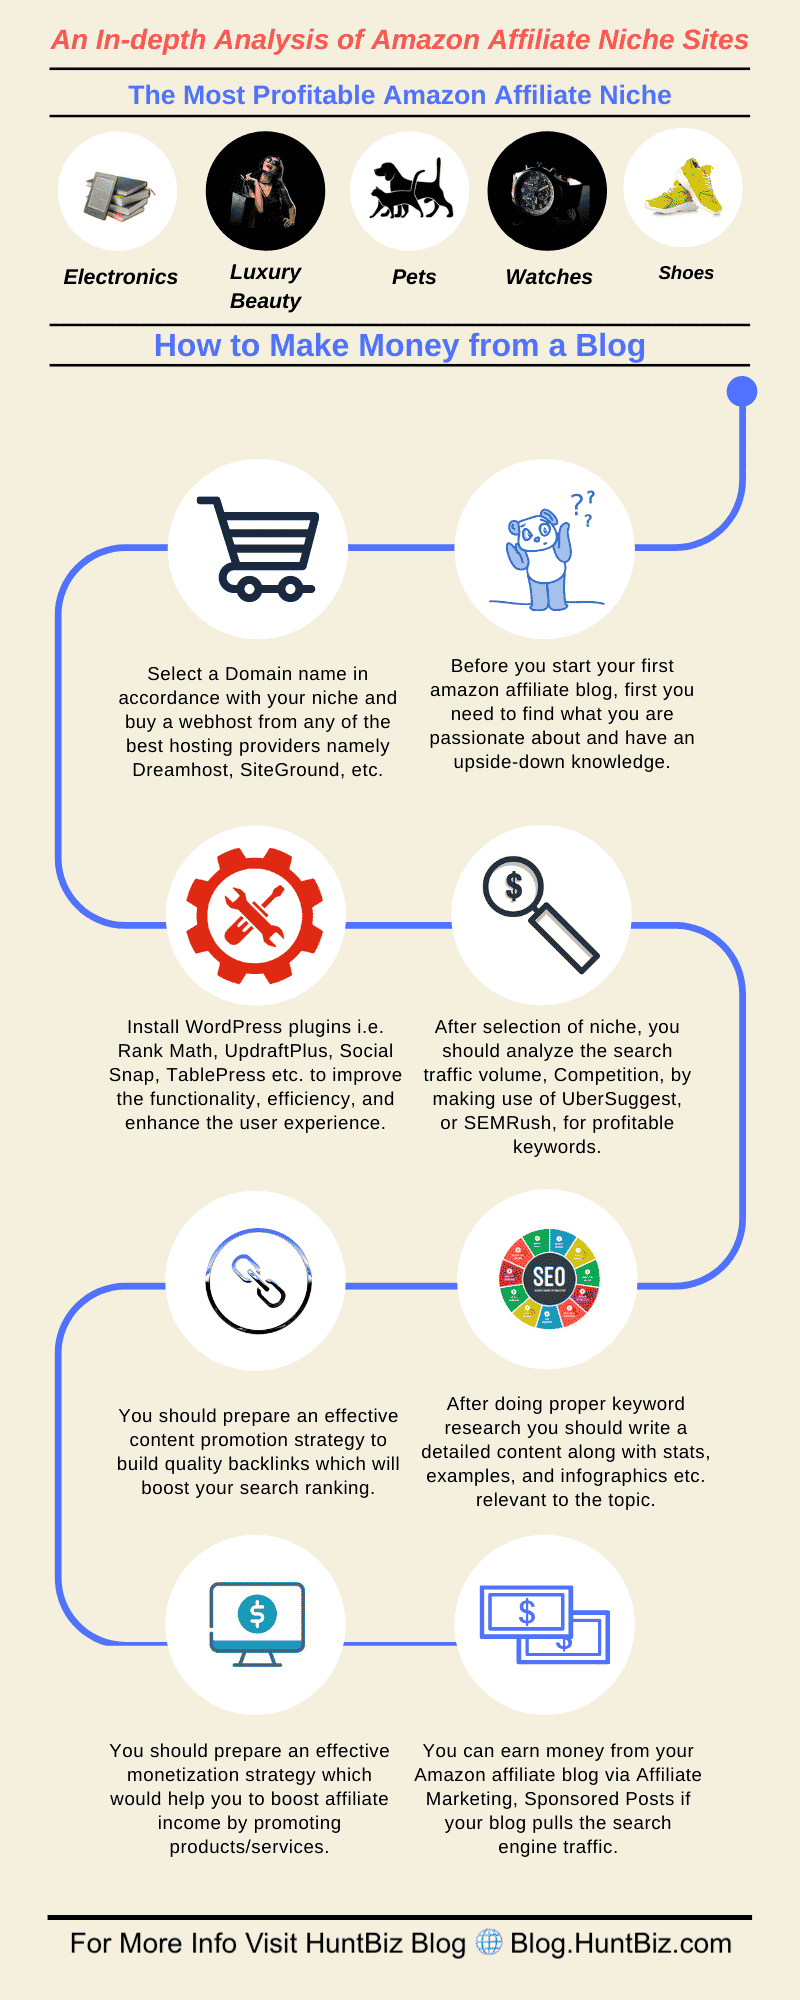
How to create Amazon Affiliate Niche Sites from scratch
No matter how much income your amazon affiliate blog makes a month within a year, here are the exact 10 steps you should follow to build an amazon affiliate niche blog from scratch that makes money.
- Step #1. Choose an evergreen niche with good income potential.
- Step #2. Register a domain name for your amazon affiliate niche blog.
- Step #3. Pick a reliable and fast Webhosting provider.
- Step #4. Pick a lightweight theme and install useful plugins.
- Step #5. Do keyword research to dearth low competitive profitable keywords.
- Step #6. Start writing SEO-optimized blog post.
- Step #7. Submit your Amazon affiliate blog in Google Search Console.
- Step #8. Link your Amazon affiliate blog with Google Analytics.
- Step #9. Leverage link building strategies to attract search engine traffic.
- Step #10. Make money from Amazon Affiliate.
Step #1. Choose an evergreen niche with good income potential
Whatever your target affiliate income you are projecting within a year, the niche selection will decide whether you get successful or not to rank your blog on a specific buying keyword.
There are many highly competitive niches namely smartphone, and laptop niches. It is very hard to be successful in these niches. There is a high possibility that your blog won’t make a penny from Amazon Associates. In other words, the laptop or smartphone niche is filled with in-depth reviews and how-to guides from authoritative blogs. So, it’s a hard nut to crack to rank a blog post on the first page of Google especially when you are a newbie in this niche universe.
When you intend to pick a low competitive profitable niche then you must address the following 5 questions to get started.
Question #1. Are you passionate about and have upside-down expertise in any niche?
No matter in which niche you have started, the sole factor that decides the future of the affiliate blog is whether you are able to deliver 4000+ words of detailed blog posts for the next one or two years.
When you have chosen a highly competitive niche such as Laptop and Weight loss solely because other bloggers are making money and you have neither a passion nor cutting-edge expertise to deliver 4000+ word articles over the years to come, then the chances are higher that your blogging venture heading to a probable collapse. If you pick a niche simply because other bloggers make money then you will shut down your blog within a year when your blog faces immense competition on profitable keywords from highly authoritative blogs or websites and you aren’t able to make money from a blog.
Instead, stick to your passion and start delivering detailed guides of at least 4000+ words to witness a sharp rise not only in the search engine traffic but also affiliate income.
Let’s make this clear with the following example.
When you probably start a blog on headphones, you must give a detailed snapshot of what parameters to check while the audience intends to buy an earbud. If you have upside-down knowledge about the impedance, sensitivity, noise isolation features, then your blog will possibly make money when you stick to it for the long run.
Question #2. Does the niche have relevant products and a paying audience?
At first select an evergreen niche that will be around for the next few decades to come and you also have the expertise to write in-depth detailed guides on that topic. Then investigate whether there is an audience who will purchase relevant affiliate products that you want to promote via a blog post.
After you have successfully chosen a niche, now it’s time to investigate whether there are affiliate products in the Amazon marketplace that you are going to promote in a blog post.
Let’s make it clear with an example.
Just visit the Review Pursuit. You will find detailed guides that cover wireless earbuds, fitness trackers, and many more. The blog solely makes money via amazon associates by promoting relevant handy affiliate products.
If you are able to deliver detailed blog posts that consist of 4000+ words in any niche then just start and stick to the blog for the long term. Don’t be disappointed even if you don’t make a penny for a quarter. Do remember blogging is a 42km marathon, not a 100m sprint. It takes time to set up a blog that generates money.
Question #3. What’s the Income potential of a Niche?
When you start a blog on Grocery & Health & Personal care, then it’s a difficult task to accomplish that you dream $1000 a month via affiliate marketing. Visit AmaProfits and calculate how much money you can make after you start a blog on a specific niche. One more thing is that different niches attract different affiliate commission rate.
Before you dive into building a site that is authoritative in the long run, you need to pick a niche that is full of products the average price of which is higher than $25.
Apart from that, investigate if the niche has high-ticket products that will give you over $50 for a sale of any product. Don’t promote a product with a price range that varies between $1 and $10. Instead, promote high ticket products that toll at least $25.
Suppose you have started two blogs on two different categories. One blog belongs to a Luxury beauty blog and the second one is about Health & Personal Care. If the two blogs attract an identical search engine traffic of 5000+ a month then chances are higher that a Luxury Beauty blog will make more money. A Luxury Beauty category attracts a 10% affiliate commission contrary to Health & Personal Care’s 1% affiliate commission.
Question #4. Have you analyzed the competition of a Niche?
Now, when you have picked a niche that you are passionate about and have the expertise to deliver 4000+ words article for the next years to come, it’s time to move on to analyze the competition of a specific niche.
Let’s make it clear with an example.
If you can write detailed blog posts of 4000+ words in the pet niche that covers foods to gain weight, foods to lose weight, what else dogs can drink besides water, best CBD oils with Hip Dysplasia, etc. then you are good to go.
Now, when you have prepared a handful list of blog posts, it’s time to analyze the google search results page on various keywords to find competition.
No matter what niche you have selected, you will find Semrush a handy tool. Semrushnot only dearth the search volume of specific long-tail keywords but also delivers the competition of that keyword. Stick to those keywords that have competitiveness score below 25.
Once you have got a list of the blogs/websites that rank on a specific long-tail keyword, analyze the competitors in respect of their backlink profile, referring IPs, referring domains, domain age, etc. If you have found that they are in this niche for more than a decade then it’s a hard nut to crack to rank your blog as a newbie.
To get search engine traffic, you should write a detailed blog post after finding a long-tail keyword with a competitive score below 25. It’s watching if there are at least 3 blogs DA < 25 that ranks on the first page of google search results on a specific long-tail keyword or not. Apart from that when you have found that at least 1 site is ranking on the first page of the search results that’s age is below one year then you are good to go.
Let’s make it clear with the following example.
Imagine, you are in the Electronics space, and tech radar and gadgets now are your competitors. Now in order to analyze them, you have to visit Semrush and paste your competitors’ URL in the search box, and hit the search button. Now, after hitting the search, you will see the following results.
Here you can get insights of what is the authority score, what is the organic search traffic a month, the number of the referring domains and overall backlink profile, etc. As we are hunting high and low for profitable keywords, that’s why we will click on “Keyword Magic Tool” to dearth all the keywords the site is ranking for.
If you are a newbie, then don’t write a detailed guide on highly competitive popular keywords, instead, find long-tail keywords that’s competition score is below 0.25 to rank your blog on those long-tail keywords. Additionally, do check are there are any blogs that’s DA is below 25 and blogs that’s domain age is below one year on that specific long-tail keywords. When you have found long-tail keywords start writing long-form detailed articles and leverage link building strategies to get high-quality backlinks from highly authoritative niche blogs to pull search engine traffic.
Question #5. Have you picked an Evergreen Niche?
When you have picked a niche namely fitness, weight loss, anti-aging, sports and outdoors, etc., and promote relevant affiliate products accordingly, the chances are higher that your blog will make money for the next few decades.
Step #2. Register a domain name for your amazon affiliate niche blog
No matter what niches you opt to kick start your amazon affiliate blog, a domain name is one of the crucial factors you should consider.
When you are hunting high and low for the best domain name that you should register, the sole factor you should remember is this: the domain name is the best one when it is easy to type and easy to pronounce.
Here are the 7 crucial points you should consider while registering a domain name.
Point #1. Opt a ‘.com’ domain extension
Whatever the niche is, always stick to the ‘.com’ domain extension if it’s available. Don’t buy domain extensions namely .photography, .review, or even .blog. A domain name without a ‘.com’ is neither trustworthy nor memorable. Suppose you have started a blog with a .review. The users will possibly type your domain name along with .com at the end of the domain name. When your blog’s URL is huntbiz[dot]review then the users are likely to type huntbiz[dot]review[dot]com.
Point #2. Register your domain name with a country-specific domain extension
When you target an audience that belongs to any specific country, for example, India then you may opt a domain name with a ‘.in’ domain extension.
Point #3. Register a short domain name
As per our recommendation, don’t register a domain name that exceeds 15 characters. A lengthy domain name is prone to be mistyped or misspelled easily. Instead, register a domain name between 6 and 14 characters. The shorter domain name is a memorable one.
Point #4. Register a domain name that is easy to pronounce and spell
Select a domain name that is not only easy to pronounce but also easy to spell and remember. It is easy for you to share your domain name when you speak to someone else even on the telephone. In the case of a domain name that isn’t easy to pronounce and spell users may type incorrectly and redirect themselves to somewhere else and eventually you lose a potential customer.
Point #5. Include Niche keywords in the domain name
The users get a clear understanding of what your blog is all about when you include a niche keyword in the domain. For example, take the example of Best Bluetooth Earphone where they include the niche keyword in their domain name to clarify what the blog is all about.
Point #6. Stay clear from Hyphens and Numbers
Don’t include hyphens and numbers in your domain name. The search engines treat domains as the spammy ones that include a hyphen.
Point #7. Don’t include Trademark Terms
Before registering your domain name it’s your task to find whether any other business is using the term that is trademarked. If you find that you have included a trademarked term, it’s a good idea to skip it and search for an alternate domain name that doesn’t include any trademark term.
Where should you register a domain name?
You may choose any domain extension, but you must register a domain name from that domain registrar which is reliable and trustworthy. We have found Namecheap as the best plausible option to register your domain name. Unlike GoDaddy, it doesn’t charge a whopping $17.99 a year to renew a domain with the ‘.com’ extension.
Step #3. Pick a reliable and fast Webhosting provider
As a newbie blogger, it is quite challenging for you to choose a reliable and fast web hosting company. There are 7 parameters you should check to digest which hosting company is offering the best webhosting solutions.
However, if you find the relevant answers to a specific web host, you can easily pick the best web hosting provider without fear. Let’s discuss the 7 questions you should ask yourself before choosing a web host.
Question #1. Does the web host load a site within 2 seconds?
If your blog doesn’t load a page within 2 seconds then most possibly your blog will witness a higher bounce rate. The worst scenario is if your blog exceeds 3 seconds to load it will result in a 7.9% drop. I highly recommend Dreamhost. This ‘WordPress’ recommended webhost loads your site within 2 seconds and hence your blog will experience a lower bounce rate.
Question #2. What guaranteed uptime does the web host offer?
You should pick a web host that offers a guaranteed uptime of four-nines i.e. 99.99%.
When you buy web hosting from a web hosting provider that has delivered a guaranteed uptime of 99.99% it necessarily means that your blog experiences 52 minutes and 36 seconds of downtime per year. On the contrary, when a web host offers a 99.95% guaranteed uptime, it signals that a blog will be down for 4 hours 22 minutes per year.
Question #3. What storage and bandwidth does the web host offer?
The bandwidth can be defined as the maximum amount of data that a WordPress blog can transfer to the users in a given amount of time. Take an example of a pipe. The larger the diameter of a water pipe is the more water it will flow out. It’s a crucial factor since the bandwidth will determine how quickly a WordPress blog can deliver the desired content to the site visitors as per their search queries.
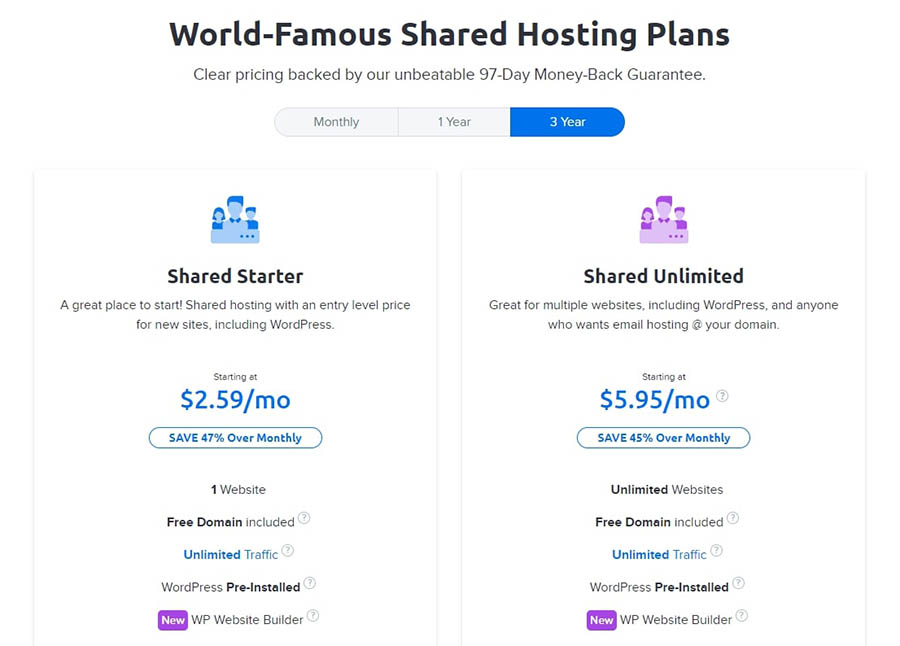
When it’s time to pick a web host watch out what bandwidth and storage the web host provides. For instance, Dreamhost offers unlimited bandwidth and storage, and you can start your blog as low as $2.59 a month.
Question #4. What are the security features the web host offers?
With the increase in cybercrimes, you need to choose a web host that keeps your website’s information safe and provides various security features that will prevent malware and DDoS attacks.
You should check what security features the web host offers to prevent malware attacks and keep the site visitors’ information safe.
Question #5. What’s the Webhosting charges for the first time and on renewal?
If you have opted for shared hosting to host your WordPress blog, you will find that a lion’s share of Webhosting companies offer at least a 60% discount as compared to the renewal prices.
But you may get surprised that almost all the Webhosting companies hike their charges on renewal up to 3x in comparison to the first-time Webhosting charges. SiteGround charges a whopping $14.99 a month on renewal. Its initial signup cost is $6.99 a month. Unlike SiteGround, and Bluehost, Dreamhost doesn’t hike their charges on renewal and you will pay exactly the same amount at the time of renewal.
Question #6. Is the customer support up to the mark?
Be it an IP Address blocked by a Firewall, or the loading problem of a blog whatever problem you face, an excellent web host offers assistance round the clock. What the best Webhosting company does is that they have a dedicated customer support team that will fix any problems as early as possible. Now, a majority of web hosting companies offer live chat support, email support, and phone support around the clock to assist customers who face any technical problem.
Question #7. For what period does the web host offer a money-back guarantee?
Usually, each Webhosting company offers a 30-day money-back guarantee. But Dreamhost, a ‘WordPress’ recommended web host offers a generous 97-day money-back guarantee unlike other ‘WordPress’ recommended web host namely Bluehost and SiteGround.
Which is the best web host to start Amazon affiliate blog?
I don’t recommend you the top 3 or top 7 best web hosts to start your Amazon affiliate blog. Instead, I recommend what I find the best after I have done a detailed analysis of the above-mentioned parameters.
I highly recommend Dreamhost, a ‘WordPress’ recommended web host that has empowered more than 1.5 million websites.
- Dreamhost offers a guaranteed uptime of 99.98% and loads your site within the industry standard of 2 seconds.
- Dreamhost lets you start a blog with as low as $2.59 a month. Apart from that Dreamhost doesn’t hike the charges on renewal, unlike Bluehost and SiteGround.
- Unlimited bandwidth and storage.
- Offers a free domain name for the first year, unlike SiteGround that charges a whopping $15.95 a year.
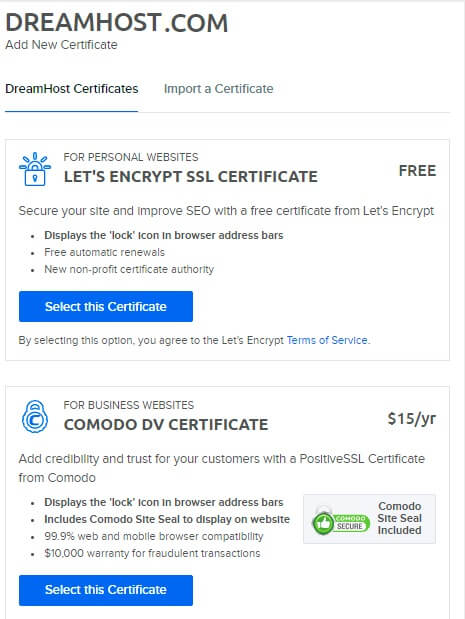
- Free SSL Certificate, unlike GoDaddy that charge $63 for a single site license.
- The monthly plan available, unlike Bluehost and SiteGround that have an annual billing.
- A generous 97-day money-back guarantee, unlike Bluehost and SiteGround that offer a 30-day money-back guarantee.
Here are the 3 cons of Dreamhost that you should be concerned about.
- No custom email address when you opt the Starter plan of Shared/WordPress hosting.
- Dreamhost has two data centers and the servers are located in the United States only.
- Dreamhost doesn’t offer live chat support around the clock, but available only from 5:30 AM to 9:30 PM Pacific time. However, you can outside those hours and you are left with ticket support, which is significantly slower.
How to buy web hosting from Dreamhost the right way?
When you click this link you will be redirected to Dreamhost plans page where you will find two options namely Starter Shared/WordPress hosting and Unlimited Shared/WordPress hosting. In case you want to start your blogging journey with only one WordPress blog then choose the Shared/WordPress Starter plan and hit the ‘Sign Up Now’ button.
Now, it’s time to enter your domain name. If you have not bought a domain name you have two options. First, you can register a domain name with Dreamhost without any cost for the first time only. Otherwise, you can register your domain name with Namecheap, an ICANN Accredited Domain Registrar.
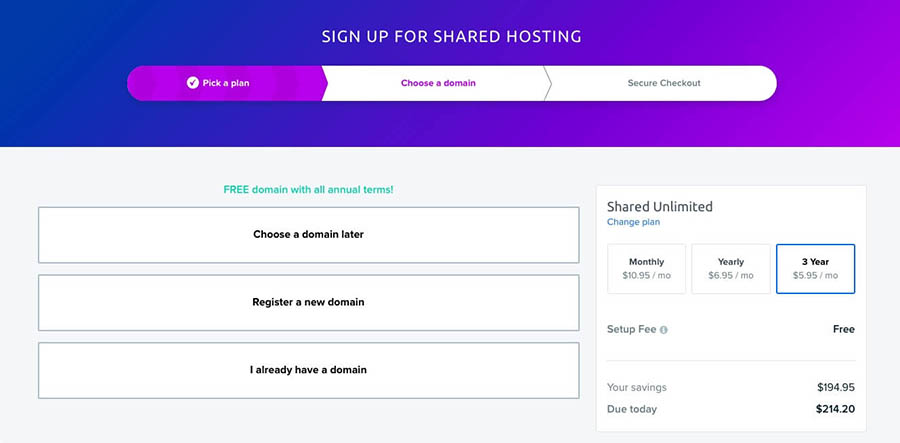
No matter where you have registered a domain name, enter a domain name in the box and move to the next step.
After you have made a payment either via a credit card or via PayPal, you will receive a mail in your registered email id with login details.
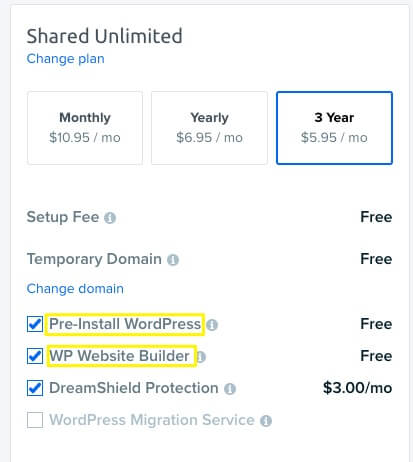
Once you have completed the purchase of the hosting package, it’s time to change the nameservers that are given by Dreamhost, if you have registered your domain name with Namecheap.
Install WordPress
Luckily, most of the web hosts offer one-click WordPress install including Dreamhost. After entering the user name and password, when you have landed on the ‘Control panel’ go to the ‘Websites’ section, and enter the domain.
After adding the website’s URL it’s time to install ‘WordPress’. Typically it will take around 15 minutes to install WordPress in your blog.
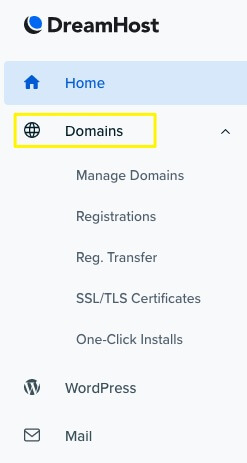
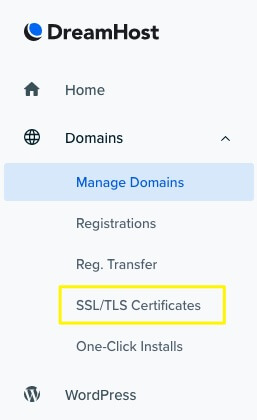
When WordPress is installed successfully, go to the ‘SSL/TLS Certificate’ under the ‘Domains’ section and install a free SSL Certificate in your WordPress Blog.
Now, after you have completed the setup of your WordPress blog, visit your WordPress dashboard by entering the following URL in the search box.
YourWordPressBlogURL/wp-admin
Read also: How to Start a WordPress Site from Scratch
Step #4. Pick a lightweight theme and install useful plugins
Are you looking for the best WordPress theme to build an Amazon Affiliate blog?
A micro-niche amazon blog receives its primary source of income from the Amazon affiliate program. We highly recommend that you should install and activate a GeneratePress premium theme that not only is a lightweight theme but also loads your site within 2 seconds. This feature is in line with the norms.
GeneratePress premium theme gives a stunning and professional look both on desktop and mobile devices. It also boosts the conversion rate of your amazon affiliate blog.
Now after installing a lightweight theme, it’s time to install and activate useful plugins to increase the functionality and customization of a newly created Amazon Affiliate Blog.
Plugin #1. Akismet Anti-Spam
Once you have got success in pulling search engine traffic, you will find a large number of comments in the comment moderation area. To get rid of spam comments install Akismet Anti-Spam and activate it to save your fruitful hours. When you install and activate Akismet Anti-spam it will stop a spam comment from appearing in the comment modification area.
Plugin #2. Rank Math
When you want to boost the on-page SEO of a blog post, you must install and activate Rank Math. This is an SEO tool that analyzes if you have inserted the focus keyword in the title tag, meta description, h2 or h3 tag, URL, etc. Additionally, it will give you an SEO Score after analyzing the above-mentioned factors.
Plugin #3. UpdraftPlus
As an Amazon affiliate site owner it’s your task to backup your amazon affiliate site’s files and databases regularly to a secured location to tackle unforeseen scenarios of hacking or DDoS Attacks.
When you have installed UpDraftPlus and saved all of your databases to a secured location namely Google Drive, Google Cloud, Dropbox, etc. then it is easier to restore the blog when it experiences a server problem or your blog gets hacked.
Plugin #4. Google Analytics by MonsterInsights
To dearth the crucial data such as what organic traffic your blog has got a month, which country your blog’s visitors belong to, or from which pages the site visitors visit, you will find Google Analytics by MonsterInsights a goldmine. After analyzing the above-mentioned factors you can prepare content monetization the right way to boost the affiliate income from your blog.
Plugin #5. Social Snap
When you are targeting social media traffic, just install and activate Social Snap that allows users to share your excellent engaging blog post on social media. Social Snap not only allows a webmaster to add social sharing buttons above or below the blog post but also counts the total share your blog post has got across various social platforms.
Plugin #6. TablePress
Since you are running an amazon affiliate blog, you must install and activate the TablePress that allows you to insert the product, price, etc. Unlike the AAWP Plugin that charges €39 a year for a single site license, it is free of cost that you can install in your amazon affiliate blog.
Plugin #7. AAWP
To boost the affiliate income from your amazon affiliate blog, you must employ the AAWP plugin to display the relevant Amazon products in various layout options namely tables, widgets, and product boxes including the product info and the price. Since AAWP uses Amazon API to fetch the latest description about the product and the current price, you will witness a boost in click-through rate. AAWP plugin lets you create the product comparison tables of relevant affiliate products.
Step #5. Do keyword research to dearth low competitive profitable keywords
No matter how detailed a blog post you have delivered in your blog that you have started a month ago, it’s a critical work to pull the search engine traffic. If your blog can not attract any search engine traffic, no one can read a blog post that consists of 9000+ words. Needless to say that your affiliate dashboard will show you a $0 affiliate commission.
But Doug Cunnington has developed a 100% white-hat method to pull organic traffic to your niche site even if you have just finished the set up of your WordPress blog.
By applying the Keyword Golden ratio, a blog post can be ranked in the top 50 results in the google search results. If your blog is out of the Google Sandbox, over one year old, a blog post can be ranked in the top 15 within a week.
What is Keyword Golden Ratio?
The Keyword Golden Ratio is a data-driven strategy that will dearth the underserved keywords on the internet.
When you divide ‘The exact number of Google search results for a long-tail keyword’ with ‘monthly search volume of a specific long-tail keyword the search volume of which doesn’t exceed 250’, the result is the Keyword Golden Ratio.
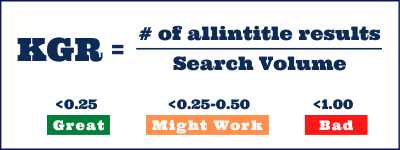
The Keyword Golden ratio is quite helpful to pull the search engine traffic by targeting the low competitive profitable keywords and witness a sharp spike in affiliate income.
A good rule of thumb to pick buyer keywords with the lower competition is that choose a long-tail keyword with a KGR ratio under 0.25. When you have found a long-tail keyword with a KGR Ratio of 0.15, but with about 23 allintitle results, you should avoid that keyword. It is because 23 other blogs are targeting the same keyword by using it in the title tag and in the meta description.
Why you should try Keyword Golden Ratio?
The Keyword Golden Ratio is a handy one to find competitive profitable keywords to generate a passive income source. Here are the 3 benefits for the keyword golden ratio.
Reason #1. Boost your motivation
A majority of bloggers shut down their blogs when they don’t make a penny via affiliate marketing within a year. But when you apply KGR properly then you will witness small wins within a quarter. These small wins will help you to stay motivated.
Reason #2. Dearth low competitive long-tail keywords
Even if you have written a detailed blog post about ‘best iPhone to buy’ that consists of 10000+ words, the chances are higher that your blog post will rank somewhere on page 9. The reason is the search results are dominated by big guns namely Toms Guide, 91 Mobiles, or Tech Radar. They are highly authoritative blogs that have existed more than a decade. But when you apply the KGR Formula and find long-tail keywords, then the chances are higher that your blog will rank on the first page of the google search results.
Reason #3. Make Money via Affiliate Marketing
Amazon affiliate blogs don’t have various monetization techniques. But Amazon associates when your blog is out of the Google Sandbox and is over six months old. If you have written content after exercising KGR Formula, you will find that your blog attracts search engine traffic and you will witness affiliate income.
How will KGR Formula help you to boost not only search engine traffic but also affiliate income?
Now, let’s dive into the detailed guide by applying the KGR formula on how to find buyer keywords that attract lower competition.
Scenario #1.
Suppose you are in the highly competitive Pets Niche. We assume that your core competency is in the areas of Dogs, Cats, and Fish & Aquatic Pets.
The dearth of long-tail keywords that are less competitive is a three-step process. Here we will employ Semrush an SEO and SEM tool that is quite handy for keyword research and can gauge the competition.
Step #1. Find the KGR compliant term
Just visit the Google Search box and type a niche-specific keyword. For instance, you are searching for KGR Complaint keywords in the Pets niches. Just enter ‘best toys for puppies’ and you will find the following result.

Now, when you have found an ample number of long-tail keywords around that topic, it is time to move to the next step.
Step #2. Visit SEMRush
It does not matter how engaging an SEO-Optimized blog post you are going to deliver, you must validate whether the keyword satisfies the search volume threshold of 250 or not. To find the search volume we will utilize a keyword research tool Semrush.
When you enter the keyword ‘best toys for puppies in crate’ you will find that the search volume of the keyword is 140 in the United States.

Step #3. Find the ‘allintitle’ result
When you type the allintitle:best toys for puppies in crate in the google search box then you will find that it displays only 5 results.

When we enter both the numbers in the KGR formula the result will be like this,

So, you have found a KGR complaint term. Now you should start writing SEO-optimized engaging blog post to attract search engine traffic that results in a sharp rise in affiliate income.
Scenario #2
When you are in the highly competitive Laptop Niche, then it’s an onerous task to find low competitive high conversion buyer keywords.
Let’s jump into this detailed guide on how you can find KGR complaint long-tail keywords.
Step #1. Find the KGR compliant term
Just visit the Google Search box and here we will type ‘best laptop under $1000’.
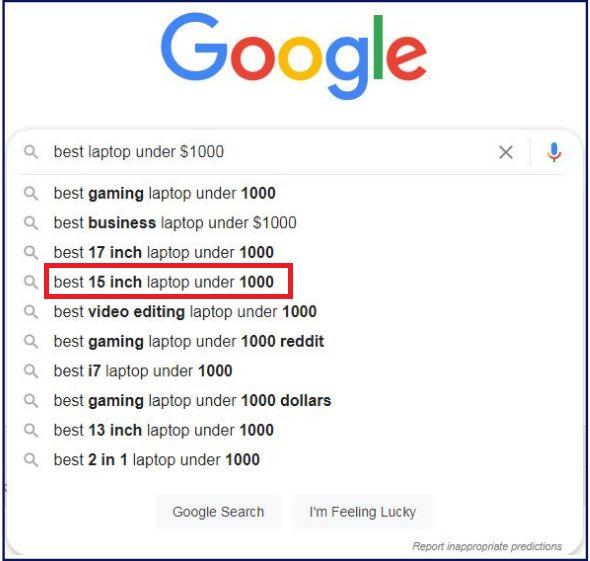
When you have found an ample number of long-tail keywords around that topic it is time to move to the next step.
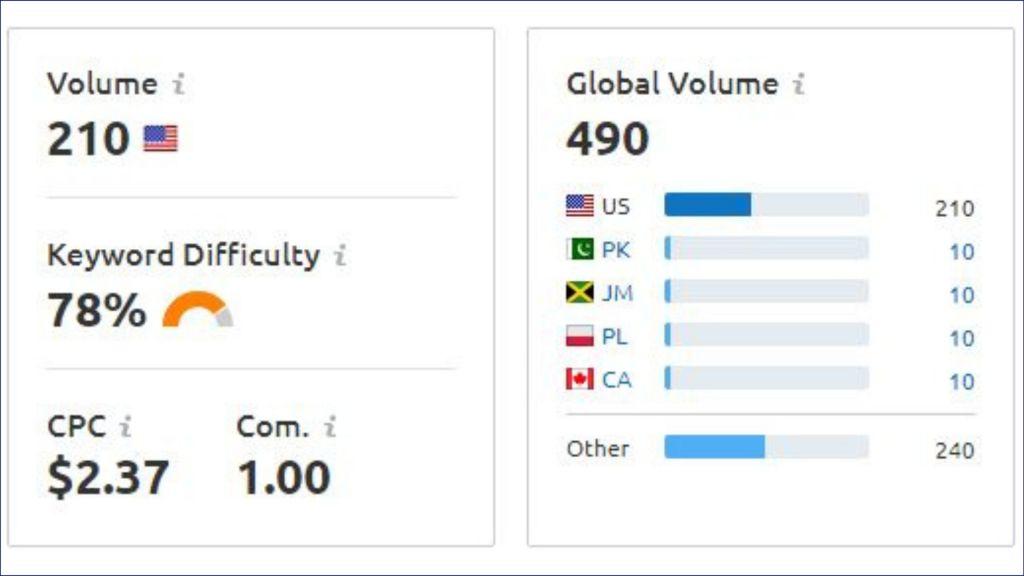
Step #2. Visit SEMRush
When you enter the keyword ‘best 15-inch laptop under $1000’ you will find that the search volume of the keyword is a whopping 210 in the United States.
Step #3. Find the ‘allintitle’ result
Type the allintitle:best 15-inch laptop under $1000 in the google search box. You will find that it displays only 9 results.

When we enter both the numbers in the KGR formula the result will be like this,

So, you have just found a KGR complaint term in the highly competitive laptop niche.
From the above examples, it is clear that the competition does not matter in any niche. If you perform detailed keyword research the right way, you will dearth long-tail buyer keywords that will boost your affiliate sales when you stick to the long run.
How to write SEO-Optimized blog posts to boost Affiliate Sales?
After you have performed deep down keyword research and found KGR compliant buyer keyword with a little competition, it’s the time to create detailed SEO-optimized blog posts and take your amazon affiliate earnings to new heights.
When you are in a witch hunt to deliver an engaging blog post I recommend you to follow the steps that are mentioned below.
Step #1. Find which blogs are ranking on the first page of Google SERPs
After you come up with a blog post, you should check what blogs are ranking on the first page of google search results for the target keyword. By analyzing the blog posts you will gauge what kind of articles i.e. listicles posts or how-to guides, or review posts are ranking on the top of the google search results.
Step #2. Find the word count of the blog posts that dominate in search results
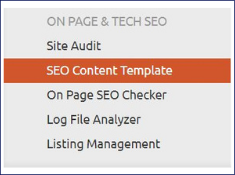
To find the average word count of the blog posts that are ranking on the google search results for a specific search query, I recommend you to employ Semrush.
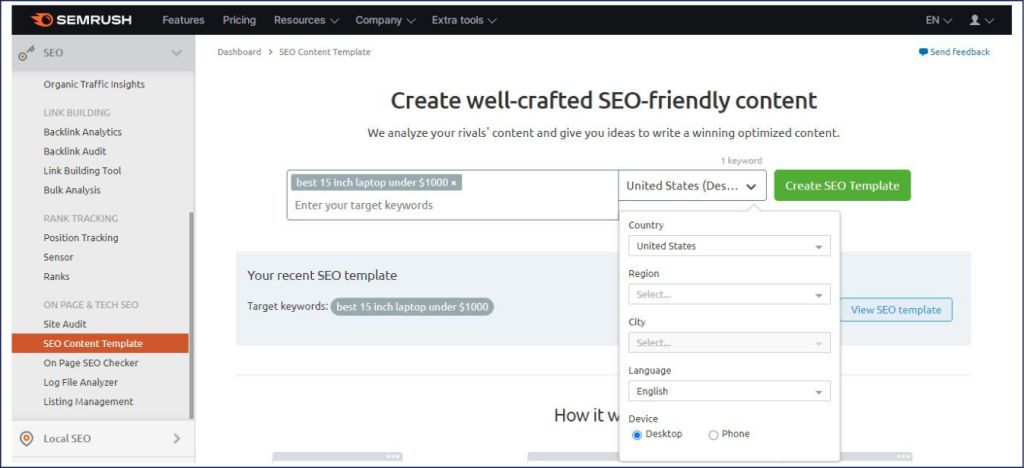
After signup when you land on the Semrush dashboard, click on the ‘SEO Content Template’ under the ‘SEO’ section.
For example, when I enter ”best 15-inch laptop under $1000′ in the search box, Semrush will show what is the average word count of the blog posts that are ranking on the first page of a specific search query.
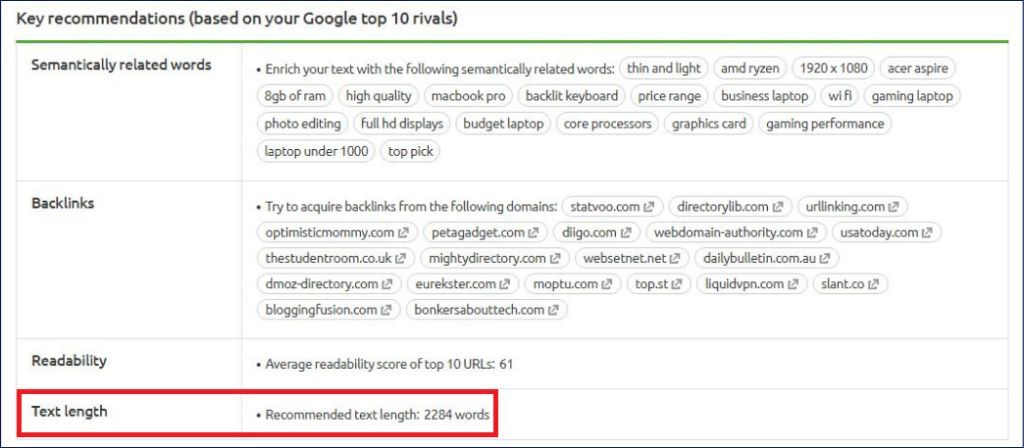
Now, after you have found that the average blog post word counts stand at 2284 words, it is the time you should apply the skyscraper technique to deliver an in-depth guide.
When you have found the average word count of a blog post, let’s move to the next step.
Step #6. Start writing SEO-optimized blog post
Do you know that 61% of the United States adults buy stuff after reading a blog post? Whenever someone decides to buy a product, he types his relevant queries in the search engine and buys a product after reading a detailed blog post that illustrates not only the benefits but also the drawbacks of the product.
Before jumping into how to write a blog post, let me show you what type of articles you can pick. Simply put, when you are about to write detailed blog posts in the relevant niche, there are 3 types of content you can write to get started in the affiliate marketing space.
List posts
Suppose you are in the headphones niche. You can write blog posts on topics like ‘Top X Best noise-canceling headphones under $100’or ‘Top X best fitness trackers to buy under $200’ etc.
When you write a list post you can promote more than one affiliate product with the pros and cons of each affiliate product. You can give a rating to each of the products that you have recommended in the blog post.
Let’s make it clear with an example.
Suppose you are in the highly competitive headphone’s niche. To prepare an attractive post of about 4000+ words you must cover the following points,
- What is wireless earbuds?
- Why should you buy wireless earbuds?
- How do wireless earbuds work?
- How to choose the best Truly Wireless earbuds?
Now after you have given a detailed snapshot of the above-mentioned information, you can promote the affiliate products by offering the top 7 or top 10 best wireless earbuds with pros and cons that don’t suck anymore.
Product reviews
Unlike the list posts, when you write a detailed product review you go through how a user can get benefitted or what problem the product will solve when he uses the product. And then you share your opinion for whom it suits the best.
If you have successfully spotted the pains of the consumers and offer a suitable solution for that problem, you will possibly witness a boost in affiliate earnings. Suppose, you have upside-down knowledge about skin problems then you can offer a viable product recommendation to heal acne skin. Do remember you should deliver an unbiased product review with pros and cons, not bullet points to boost affiliate sales.
Comparison blog posts
By offering the comparison posts, you typically compare the best selling products of any specific category. When you deliver a comparison post, you help your audience to understand the pros and cons of each product and give a detailed snapshot of which product suits the best under certain circumstances. Simply put, by writing the comparison post you don’t suggest which product is the best, instead you help the audience to pick the best product under certain conditions.
Let’s make this clear with an example.
Suppose you are in the highly competitive ‘Laptop’ niche. Now, when you are writing a comparison post between two laptops namely HP ENVY x360 Laptop and HP ProBook 430 G5 laptop, it’s your task to recommend which laptop is the best for gaming and which one is the best for programming.
What is On-page SEO and How to Optimize a blog post to boost search engine traffic?
When you have found 25+ long-tail keywords with a buyer persona, it’s time to optimize a blog post to pull the search engine traffic. Here are the best strategies you should apply to deliver an engaging SEO-optimized blog post to attract search engine traffic.
A catchy Headlines – The first thing a visitor watches is nothing but a headline of a blog post in the google search results. When the heading of the blog post is stunning and stirs up emotion then people will visit your blog and thereby increase the click-through rate.
A Neat and Clean URL Structure – Use a short and clean URL structure to boost the click-through rate. When you have completed a detailed guide on how to start a blog then the URL of a blog post like this, YourBlog/how-to-start-a-blog/ instead of YourBlog/2021/02/10/how-to-start-a-blog/
Place LSI Keyword – When you put the LSI keywords not only in the blog post but also in the h2 or h3 headings, it helps the search engines to gauge what the blog post is all about.
Put the focus keyword in the first 100 words – To boost the search engine traffic you must insert the focus keyword once in the first 100 words of your blog post. This will help search engines to crawl a blog post in the best plausible way.
Meta Description – A meta description will help the users to find what the blog post is all about and what topics you have covered in the blog post.
‘Alt’ text – No matter how stunning visuals you have inserted in the blog post. If you haven’t given proper ‘alt’ attributes, all of your efforts will go in vain. Put a relevant ‘alt’ text for an image. This will help search engines to find what the image is all about.
Inbound and Outbound Links – Add not only inbound links but also outbound links in the blog post. This will boost your search visibility.
Step #7. Submit your Amazon affiliate blog in Google Search Console
Now, when you have published a stunning blog post and pages namely About us, Contact us, Disclaimer, Privacy policy, it’s time to submit your amazon affiliate blog in Google Search Console.
When you are aiming at pulling search engine traffic, you must submit your amazon affiliate blog in Google Search Console. When it’s done you will find the total impressions your blog has got, total clicks, click-through rate, and average position of your blog posts.
Submission of your amazon affiliate blog in Google Search console is a three-step process and here I have outlined the step by step process to submit your blog in Google Search Console.
Step #1. Visit Google Search Console and sign up with a Gmail Account.
Step #2. Click on the ‘Add a Property’. Now put the URL of your amazon affiliate blog under the ‘URL Prefix’ column and click on the ‘Continue’.
Step #3. Now it’s time to verify your amazon affiliate blog. Just copy the code under the ‘HTML tag’ and paste it in the header section between <head> and </head> section.
Once saved, visit the Google Search Console and click on the ‘Verify’ button.
Once verified, click on the ‘Sitemaps’ button and create a new XML Sitemap of your amazon affiliate blog. Just type ‘sitemap_index.xml’ after the URL of your blog and click on the ‘Submit’ button.
Congratulations!
You have just submitted your blog in Google Search Console. Now Google will crawl all of your webpages and display your page on relevant search queries.
Step #8. Link your Amazon affiliate blog with Google Analytics
When it’s time to get insights from which region your blog gets visitors, or what are the top pages that pull search engine traffic, or what is the bounce rate, etc. you must link your Amazon affiliate blog with google analytics. You can get the above-mentioned insights by following the 3 step process.
Step #1. Go to Google analytics and click on the ‘Set up for Free’ tab.
Step #2. Now create a google analytics account by furnishing the Account name, website name, website’s URL, country, and time zone.
Step #3. Now, after you have finished the set up of property, the next task you need to accomplish is to copy the ‘Global site tag’ and paste it in the amazon affiliate blog between the <head> and </head> section under ‘Header.php’ section.
Congratulations!
You have successfully linked your amazon affiliate blog with Google Analytics.
Step #9. Leverage link building strategies to attract search engine traffic
Are you dreaming that after you have published an engaging SEO-optimized blog post, your blog will pull the search engine traffic and you will make a decent affiliate income through Amazon associates?
If yes, then you are in a fool’s paradise.
When it comes to attract search engine traffic, you need to acquire high-quality backlinks from highly authoritative blogs on the web. As you have started a niche site the chances are higher that you don’t acquire high-quality backlinks yet. To boost search engine visibility and pull search engine traffic, as a niche site owner, you should leverage link building strategies to acquire quality backlinks from relevant authoritative niche sites.
Let’s deep dive into the 7 strategies that you can apply to acquire backlinks from highly-authoritative blogs.
Strategy #1. Bloggers Outreach
This is one of my all-time favourite link building strategies to acquire high-quality backlinks from authoritative blogs. But let me tell you it takes time to get fruitful results.
When you have published a detailed blog post of 5000+ word then you should reach out to the other bloggers in your niche and inform them about your blog post. If they find your article helpful for their audience, they may share the article on social media. When you are on their radar you can request a guest post, and link to your resource page.
Strategy #2. Guest Posting
Guest posting allows you to acquire a high-quality link by writing a detailed blog post that is published in someone else’s blog.
Simply put, guest posting is the simplest way to acquire links from authoritative blogs in exchange for a blog post that usually consists of 2000+ words.
When your blog post is published you will get a valuable backlink either in the author bio section or in the body of the article anchored to a specific keyword or phrase.
Strategy #3. The broken-link building
Broken Link Building is the widely used tactic where you as a webmaster are in a witch hunt for resources that no longer exist but a niche site has linked to a resource page that no longer exists. Since you inform the webmaster about the 404 error page and offer an alternative resource, the webmaster is likely to link to your resource page. In this way, you can get a quality backlink from an authoritative niche blog.
Strategy #4. Steal competitors Backlinks
If you can dearth which high authority blogs are linking to your competitors, they’ll happily link your excellent resources if they deemed fit.
To find what authority blogs link to your competitors, head over to SEMRush and enter your competitor’s URL.
Boom!
SEMRush will show you from which sites your competitors get backlinks. Now conduct deep down research on how your competitors have acquired backlinks. If you find that they have acquired backlinks via guest posting, then start writing guest posts for the same sites and acquire high-quality backlinks to boost search engine visibility.
Strategy #5. Acquire backlinks from Unlinked Mentions
When you find unlinked brand mentions, then you must reach to the webmaster and ask them to insert a link to it.
But how will you find the unlinked brand mentions?
Simply just head over to SEMRush and set up the Brand Monitoring Tool to find unlinked brand mentions. When you find the unlinked brand mentions, write a mail and request the webmaster to put a link on the brand mention.
Strategy #6. Help A Reporter Out
HARO connects journalists who are looking for a source for upcoming stories with a webmaster who is searching to acquire high-quality backlinks for that excellent resource that a webmaster is offering. After you have completed the registration process, now you will receive 3 emails a day on weekdays across various categories. When you have found the most relevant queries, it’s time to make a pitch and get a quality backlink from highly authoritative blogs in your niche.
Strategy #7. Acquire links from Link Roundups
Simply put, Link roundups are the daily, weekly, or monthly curated lists of the best resources that are available on the web in a particular niche. After you have published a share-worthy resource, it’s time to search for authoritative blogs that post link roundups.
Type the following phrases in the search box to get started,
- “Keyword/Phrase” + “link roundup”
- “Keyword/Phrase” + “weekly roundup”
- “Keyword/Phrase” + inurl:roundup
- “Keyword/Phrase” + intitle:roundup
When you’re hunting high and low for link roundups then check if the link roundups are active or not. If not, then you are wasting your valuable time by pitching for link roundups to sites that haven’t published link roundups now.
Step #10. Make money from Amazon Affiliate
Now, after you have successfully published 25+ detailed blog posts between 4000+ and 7000+ words, focus on acquiring high-quality backlinks to pull search engine traffic to your Amazon affiliate blog. When your blog starts getting 1000+ page views a month, it’s the perfect time to monetize your blog from Amazon Associates.
How to Sign up in Amazon Associates?
Let’s discuss how to monetize your blog by Amazon Associates.
Step #1. Head over to Amazon Associates and click on the ‘Sign Up’ button. Now you are prompt to furnish your name, email address and password to get started.
Step #2. In the next step, you need to enter the ‘Payee Name’, ‘Address’, ‘Phone number’, ‘Country’, etc. under the ‘Account Information’ Section.
Step #3. After furnishing the above-mentioned information in the ‘Website and Mobile App List’ section, you need to enter the URL of your amazon affiliate blog.
Step #4. Under the ‘Profile’ section you need to furnish,
- What will be your preferred associates’ store Id?
- In which niche have you started your blog?
- What type of amazon products are you going to promote via your blog?
- Does your blog pull search engine traffic or get via paid advertising?
- What monetization technique do you apply to monetize your blog?
- How many unique visitors does your amazon affiliate blog get a month?
…Counting.
Congratulations!
You have successfully created your amazon affiliate account. Now you are free to promote relevant affiliate products to monetize your blog.
Are you aware that Amazon associates have a dedicated affiliate program for different countries?
For example, when your blog traffic is coming from the United States only then you should apply for the Amazon affiliate program for the United States. Contrary to that, when your blog has pulled search engine traffic from not only the United States but also from the United Kingdom then you should monetize the traffic by applying for both countries.
It requires strenuous effort to place the affiliate links manually that redirect the users to a country-specific Amazon store. To solve that problem, Amazon comes up with the OneLink feature. Amazon’s OneLink will redirect the users to their respective amazon stores to buy a product. You will earn an affiliate commission when your blog gets traffic not only from the United States but also from the United Kingdom.
You can set up the OneLink when you have a verified US Amazon Associates account. Also you can link your US Amazon Associates account with the countries namely Canada, France, Germany, Italy, Japan, and United Kingdom via the OneLink feature.
Now, I assume you have signed up for the amazon associates account for each country from where your blog gets search engine traffic. I highly recommend you to place not only the banner ads on the sidebar and between the blog post but also native ads where you deemed fit to boost the click-through rate and affiliate income.
Your Turn!
Don’t expect that your blog will mint $1000+ a month within a quarter after you have published 25+ blog posts within a quarter. Do remember building an amazon affiliate blog that makes money is not a 100m sprint but a 42.2km marathon.
Frequently Asked Questions on How to Create a Blog for Amazon Affiliate
Do Amazon Associates have charge a fee to join?
No. Amazon Associates don’t charge a fee to join the affiliate program. It’s free to join.
Can I join the Amazon affiliate program without a blog?
Yes, you can join amazon associates even if you don’t have a blog. When you have a Facebook Group/Page or a strong social media following then you can promote affiliate products via social media. But, it’s a better idea to set up a YouTube channel or start a blog where you can promote amazon affiliate products.
Can I create an amazon affiliate account across various countries?
Yes, you can create an amazon associate account across the United States, United Kingdom, Italy, France, Japan, Spain, etc.
Why should I join Amazon Associates when its commission is pathetically low?
Amazon Associates allow a webmaster to earn a commission even when a user doesn’t buy ‘wireless earbuds’, that you have recommended and bought ‘fitness trackers’ instead. Frankly speaking, my first three sales did not come from those products that I promoted.
How many blog posts do I need to publish before applying for Amazon Associates?
Don’t follow the terrible advice from self-proclaimed affiliate marketers who advise you to publish at least 25 blog posts. Frankly speaking, all you need to publish 10 posts following keyword golden ratio. I have applied to amazon associates and got approval with just 7 detailed blog posts of 4000+ words each.
How many blog posts should I publish a month?
It doesn’t matter whether you have published 10 articles a day, or once in a month, or after publishing 15 articles a month you haven’t published a blog post for a year. When you leverage link building strategies and acquire high-quality backlinks from highly authoritative blogs, your blog will witness a steady rise in search traffic and probably affiliate income.
Can I join other relevant affiliate programs along with Amazon associates?
Definitely yes.
Suppose you are in the pet niche then you can join relevant affiliate programs namely Chewy, Petco Supplies, Eusoh Pet Insurance, etc. along with Amazon Associates.
Can I insert amazon product images within the blog post?
Yes, but I recommend that you should insert images by using the SiteStripe tool to stay safe from violating any copyright issues or Operating agreement of Amazon Associates.
What is the ideal word count of a blog post?
After making use of Semrush you will find that the average length of a blog post that ranks on the first page of the search results. You should write a detailed blog post. When you have found that the blog post’s average length is 2500+ words, then you should write a detailed guide of 4000+ words.
Can I make $1000 a month via Amazon Associates?
Doug Cunnington, a niche site expert, has made $70,000 a month from just only one blog. Despite the commission cut, if you deliver one blog post a week between 4000 and 10000 words and leverage link-building strategies, then the chances are higher that you can make $1000+ a month with ease within a year.
Read also: Which type of blog is best to earn money?
Hope this article will help you to set up an amazon affiliate blog that can help you to make a five-figure income a month. Have I missed any point that will help a webmaster to scale an Amazon affiliate site? Let me know so that I can update it ASAP.
You completed various fine points there. I did a search on the subject matter and found mainly persons will agree with your blog.
I constantly emailed this web site post page to all my friends, because if like to read it after that my links will too.
Thanks for sharing, it is a fantastic post. Significantly thanks yet again. Definitely Great.
You have brought up a very great points , regards for the post.
Creating Amazon Affiliate niche sites is an exciting and potentially lucrative venture in the world of digital marketing. As someone who offers digital marketing and website design services, I’d like to highlight the synergy between these two aspects. A well-designed website optimized for affiliate marketing can significantly enhance your chances of success.
Good
Wow, what an insightful guide on creating Amazon Affiliate Niche Sites from scratch! Your step-by-step breakdown makes it seem achievable for anyone, even beginners like myself. I appreciate the emphasis on research and selecting the right niche—it truly sets the foundation for success. Thanks for sharing your expertise and empowering us to embark on this lucrative journey!
Good Article.